Showing posts with label holidays. Show all posts

Saturday, December 21, 2013

Bringing DIY to my Classroom


To say that our classroom was filled with Christmas cheer this week would be a mild understatement. For one of our activities, I had my students create an ornament with their big 'ol 5th grade smile tucked inside for their families. Last year, I made a few ornaments for my own tree that you can read about here. It was fun bringing the spirit of DIY to my classroom and equally exciting having my students create a gift for a family member - now I'm just hoping that gift made it home and found its way to a tree. :)

For the project, we used a ball-shaped ornament, and a photograph to roll up and stick inside. The end result was pretty stinkin' cute. 


Stuffing the Ornaments
What holiday crafts did you complete with your students?

Happy weekend! 

Thursday, December 19, 2013

Here Comes 2014!

*** Update! Since this was posted on WeAreTeachers Facebook page (hooray!), Eve over at Science Notebooking created another version on the document swapping out the resolutions for "1" and "4". You can find her file here.  ***

The new year is approaching and today my students and I talked about our resolutions for next year. In class, we have talk tremendously about the value and purpose of goal setting - especially setting attainable goals. This was just another great exercise in setting practical and reachable goals... even for myself! 


Through Pinterest, I stumbled upon a great foldable from 2013 at Frugal in First and gave it a little facelift for 2014. (Side note: the foldable doesn't match up exactly but it's still pretty fancy!)

Download the file here from Google Drive.

Happy last few days of school!

Monday, February 4, 2013

Sending Love in a Box!

If you've been a follower of my blog for some time, you may know that I'm an aunt to the cutest and sweetest niece and nephew. Now, I don't live in the same town as them but I'm close enough to pop over for dinner or invite myself over for the weekend. That's something aunts do, right?

This year, I wanted to surprise BDE and Libby on Valentine's Day with a gift. My original plan was to ship a box full of goodies in the mail and have it arrive on Valentine's Day. Since I was making a trip home to celebrate my Dad's birthday, I decided to present the gift in person! (Sorry Post Office.. you'll get my business next time). I had intended on making BDE wait until Valentine's Day to open the present, but I quickly realized that would have been cruel and unnecessary punishment for a 3-year old.  I have so much to learn.  


Inside the box, I stuffed loads of candy (you're welcome, sista!), onesies and dresses for Libby, and Jake and the Neverland Pirate goodies. Did I mention my nephew is a pirate? Yes, he's a pirate. On top of the gifts, I cut out several hearts on my Cricut and dumped them in the box. 


BDE made sure to bypass the paper hearts and get to the stuff that mattered ... like tootsie rolls and skittles. I can't blame him, those are my favorite candies as well. :)


He dug through the box and found his Jake goodies, but I had to reel him back in to find Libby's gifts. After, of course, he stood inside the box. 


Even though I won't be able to spend Valentine's Day with my favorite little ones, at least I was able to shower them with love in the form of paper hearts, candy, and coloring books - all wrapped up in a box.

What Valentine's Day plans to you have in store?

Sunday, February 3, 2013

It's O-FISH-AL!

I love how holidays provide perfect opportunities to give gifts with good puns. I wanted to give my students a cute little Valentine with a clever pun attached. Now, I can't take credit for the pun, but I can take credit for the execution! 


Happy Superbowl Sunday!

Wednesday, December 19, 2012

The Best Way to Spread Christmas Cheer...

...is singing LOUD for all to hear! My class took Buddy the Elf's advice and spread a little content Christmas cheer.

Let me back up. 

Earlier this week, my students and I began brainstorming a list of everything we have learned in science and math to create content Christmas carols. My students were floored by the amount of topics we were able to come up with. I heard several kids exclaim, "WOW! We've learned A LOT."


Then, I gave my students a packet of traditional carols that we've all grown to love. I challenged them to rewrite the traditional carols into CONTENT carols. Instead of singing about Christmas trees, winter wonderlands, and little drummer boys... they would be singing about plants, the Moon, and clouds.

Santa Baby Gets a Facelift. 
After students partnered up and wrote carols, I had them type their carol to share with their classmates. Today, we took our Christmas carols through the hallways and spread a little content cheer! A big thank you to the teachers who let us interrupt their days to sing a song or two. I know my kids enjoyed every minute of it. I have to admit, I was tapping my foot along with them. Such a talented group of singers and song writers I have! :)

Monday, November 19, 2012

Glitter Blast!

In continuation with my "It's not you Thanksgiving, it's me" series, I bring to you another Christmas craft. Sunday was a whirlwind of DIY-mania. Hopefully, this post may bring a little peace and joy to your evening!

At Michaels I bought white wooden block letters and gave them a little make over. I spray painted each one a metallic gold and glitter blasted them with paint. I wish I had coined the term, "Glitter Blast", but the spray paint company beat me to it. I plan on incorporating it into my vocabulary more often. 

 It's a puzzle. Can you figure out what the word is supposed to be? I'm glad I painted the letters in the wrong order and then took the picture. 


I glitter-blasted (according to the spray can) my letters to give them a little sparkle. I love the way they shimmer and shine in the sunlight! Practically Edward Cullen in letter form. 


I stuck the letters on a wreath and added a few pine cones and berry garland to give it that classy Christmas feel. The letters are little wonky on the wreath, but that's my middle name. Wonky. Jordon Wonky F. Nothing is ever straight or in perfect order... every thing I do has a little wonky touch. The more I say "wonky" out loud the weirder it sounds. 


Peace on Earth and goodwill to men.

Glitter-Blasted
In addition to my "peace" letters, I also bought larger white block letters at Michaels. I painted them metallic gold with a glitter blast as well. They are happily propped up against my lamp next to a photo that brings me joy. 


That's all folks! 

Sunday, November 18, 2012

A Chalkboard Christmas

First, I must apoligize to Thanksgiving. Mentally, I have already moved onto Christmas. My house, too, has already moved onto the winter holidays. It's not you, Thanksgiving, it's me. 

This two day work week mentality has my crafting juices flowing. My grades were exported on Friday (hip hip hooray), so I'm ready to enjoy this week with all of the people that I love the most! One of my many projects this afternoon were chalkboard creations. I purchased these little wooden cut outs at Michaels today and gave them a new look. 


Several hours later, I gave each one a cute little holiday quote. It seemed appropriate to write something about chilly weather on the snowflake. If you're getting technical, it's really not cold outside. Actually, it's quite wonderful outside right now. But, we're not technical here. 


For the bell, I picked a quote from my favorite Christmas book, "How the Grinch Stole Christmas". Because you know, in Who-ville they say the Grinch's small heart grew THREE SIZES that day!


Lastly, I gave an old poster a new look with, yes... you guessed it! chalkboard paint. Now, proudly hanging in my living room is a quote from one of my favorite movies, Elf.  Buddy the Elf provides a lot of my motivational quotes around the holidays. He's a wise 'ol elf!


 Happy Sunday!

Tuesday, July 3, 2012

Patriotic Fun with Betty Crocker

Happy Tuesday, friends! As I mentioned yesterday, I really got into the patriotic cooking spirit this weekend. I didn't stop with the fruit salsa and pita chips. Instead I decided to attempt to create a red, white, and blue cake thanks to Betty Crocker. Let me just say, I followed her directions word for word. Betty said, "jump!" I replied with, "how high!?" It was a wonderful afternoon. 

Click here to follow the recipe to make your very own Red, White, and Blue cake for the holiday! In the mean time, here is how my cake turned out!

Red, White, and Blue Cake Shopping List:
White cake mix
Eggs
Vegetable Oil
Red and Blue food coloring
Bundt cake pan
Fluffy Frosting (you'll end up melting it, so the fluffy kind works well!)
Sprinkles if you wish!


Notice the mess in the background? Pretty standard.
After dying the cake red and blue, my fingers had started to change colors. Good thing I was wearing an apron otherwise my guests wouldn't have recognized me.


Viola! I drizzled the icing all over the cake and topped it with fancy star sprinkles. If you look closely, you can see the chunk missing from the middle of the cake. That cake was definitely left in the bundt cake pan. 


Usually I'm alone cooking the kitchen, so I took this opportunity to pose with my puurty cake. I was very excited after it was finished and I didn't want anyone eating it soon. We waited until later that night to dive into the yummyness.

Red, White, and Bluuuue!
 The MU plate adds a little Mizzou flair to the patriotic spirit of this cake.

On another note, remember when I posted about meeting scientists with my students? Click here if you want to refresh your memory. Barbara over at The Corner on Character posted about John and his Girls on a Misson presentation. Check it out! 

Linking up here with Tuesday Talent Show!

Monday, July 2, 2012

Fruit Salsa & Pita Chips

This past weekend a few friends and I celebrated the 4th of July a little early. Needless to say, I took this opportunity to experiment on a few patriotic treats. Today, I'll show you how I made a fruit salsa and homemade pita chips. 

Originally, this fruit salsa recipe wasn't supposed to be red, white, and blue but it just kind of happened. I bought way too many blueberries (and understatement of the amount of blueberries in my fridge) and couldn't find any kiwi. Oh well! The salsa was delicious. 

Fruit Salsa:
(Depending on how much salsa you want depends on how much fruit you put in - go wild!)
2-4 apples (chopped)
Strawberries (chopped)
Raspberries
Blueberries
2 tsp Fruit Preserve (if you add more fruit, add more preserve and sugar)
2 tbsp white sugar
1 tbsp brown sugar

Combine all of the ingredients and pop it in the fridge for 30 minutes or so. The longer the better if you ask me!

Pita Chips
Tortillas (10 or so - again, depends on how many you wish to make!)
Vegetable oil
Sugar
Honey

Using a pizza cutter, create small chips from the flour tortillas. Pour vegetable oil in a skillet and let the oil warm for a few minutes. Toss a few tortilla slices into the skillet and let them crisp for a few minutes. After awhile, your oil becomes quite warm and it takes about one minute per chip. Be careful! A few of my chips wound up outside because I got distracted.

Place your cooked chips on a plate and drizzle with sugar and honey. Use them to dip into your fruit salsa and ENJOY!


What patriotic recipes are you testing out this year?


Friday, April 6, 2012

Insta-Friday

Happy Friday, friends! Not only have we finished MAP testing for the year, but we are on Easter break. Hallelujah! I slept in today. Then, slept some more. It was beautiful.

For a little Easter treat, I made a very simple Bunny Bark (snagged from Pinterest of course). It's delicious and hoppy, like a bunny rabbit.


Here's what I used:

  • pretzels
  • Easter M&M's
  • white chocolate chips
Make it!
  • Cover a cookie sheet with wax paper. Sprinkle pretzels and M&M's generously on top of the wax paper. 
  • Melt white chocolate chips in microwave. Melt for 30 seconds, stir. Melt for 30 seconds, stir. That way you won't burn your chocolate!
  • Pour the chocolate over your pretzels and M&M's. 
  • Stick in the fridge to let harden. 
  • Break up the bark into bite size pieces and enjoy!
Enjoy your weekend! :)

life rearranged

Thursday, December 29, 2011

Breakfast with Martha!


Sunday, October 2, 2011

Pumpkin Mania!

At the expense of my laundry and the cleanliness of my house.. I'm blogging. I clearly have my priorites in perfect order. Now first, some exciting news!

Wahoo! Casey at Cardigans and Curriculum nominated me for the "I Heart Your Blog Award". Thanks Casey! I'll be nominating a few of my favorite  blogs, soon!

It gets even better! Barbara at The Corner on Character nominated me for TWO awards! This must be what Sally Field felt like when she accepted her Oscar.  They like me! They really like me!


I feel so honored! Thank you everyone for making me feel super special. :)

Guess what season is here? Oh yes, it's fall. The leaves are-a-changin' and it's time for me to whip up some fall crafts. I've been pinning tons of autumn crafts. I've found this little gem and decided to make my own!


Little Things Brings Smiles has an excellent post for creating your own felt fall wreath. I thought it would be fun to dabble in the natural wreath and felt flower craze. 

I bought a natural brown wreath at JoAnn's for $5.00 and my sister picked up some felt for me at Wal-Mart. Then, I had to figure out how to make flowers out of felt. Lucky for me the very same blog (Little Things Bring Smiles) posted a tutorial for flowers at  Felt Fun. Click here to read for yourself!

Felty and Fabulous
The wreath turned out to be a perfect gift for my Grandma. She loved it!

Happy Birthday, Grandma!

I wasn't done there! Thanks to Pinterest, I have easily 10 more crafts I neeeeeeeed to make before October 31. My MIZZOU wreath has been hanging on my classroom for awhile now and I'm needed a little Halloween spirit! Then, I found this...


Pretty Ditty made the cutest Halloween wreath and I knew I had to recreate. While watching Bridesmaids with my sister and brother-in-law...  I started wrapping the 'ol straw wreath with yarn!

I used the following supplies:
-1 straw wreath
-orange yarn
-black yarn
-glue gun
-cardstock

Click here to download her "BOO!" template. All you have to do is download the pattern and print! I had full intentions of printing my "BOO!" letters on a paper bag until I realized I didn't have any. I figured my McDonald's bag wouldn't have the same affect.. so I stuck with white cardstock.

Did I Scare Ya?


In other news....

There was a murder on my front porch. 


I came home from school this evening to find my poor pie pumpkin brutally murdered. Looks like a crime scene on my front porch.

I wish I was making this stuff up.

Tuesday, July 5, 2011

Land of the Free and Home of the....... CHIEFS! (sorry, old habits die hard)


It's hard not to smile when looking at that little face! I hope your 4th of July was as exciting as mine. I grew up loving the holiday and now I have a true appreciation for it. It's a great way for family and friends to get together and mingle. If you know me, you know I love to mingle!

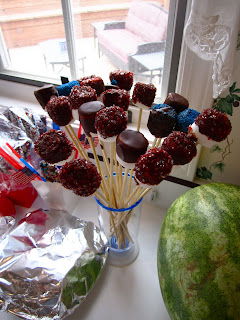
I went a little overboard with making goodies for the holiday. I got really excited about dipping things in chocolate and using food coloring to dye things red, white, and blue!

First, I cheated. I have never been able to successfully melt chocolate without burning everything in site. So, I bought this:


....and holy smokes! IT WAS AMAZING! It cut down on my frustration level completely and it tasted yummy.

First, I snagged Martha's idea and made Pretzel Sparklers and they were delicious and super simple.

Kudos, Martha!
Next, since I was on a roll with dipping things in my cheater chocolate I moved onto marshmallows. I thought it would be a great idea to have my 2 year old nephew help with this feat. He carefully took the skewered marshmallow and SLAM-DUNKED it into the chocolate. After drizzling chocolate all over the counter and me, I took over. No need for a panic attack on the 4th!


After a few minutes of practicing our colors, I had a bowl full of red and blue M&M's to decorate my rice krispies.

snap, crackle, POP!

The trick to my rice krispie treats is less KRISPIE! I don't put in the full 6 cups of cereal that the recipe calls for. That way, they are more gooey when you eat them. My tip comes with a warning though: once I thought it would be a good idea to use food coloring to dye my treats another color for Valentine's Day. Of course, I picked the color of l-o-v-e: red. Do you know what rice krispie treats look like when they are dyed red?

Raw meat. It was difficult trying to convince people to eat my snack when they thought I had brought raw meat to our food share! Be cautious of what color you dye your treats!

The food I posted today is so easy... your 5 year old cousin could make it. Really, famous chefs would probably laugh at this post because of its simplistic features! Oh-well.. they tasted yummy and were stress free!


Enjoy a picture of my pooch, Alex.

As Tigger would say... TTFN! 

Add This

LinkWithin

Related Posts Plugin for WordPress, Blogger...