Showing posts with label mod podge. Show all posts

Tuesday, July 23, 2013

Thanksgiving in July

This summer, a friend and I decided to tackle some holiday crafting because time always seems to slip away in November and December. Brilliant, right? Right!

I was inspired to make a cute little craft after seeing the adorable blocks my friend made for her husband for Father's Day. I packed my bags and went on a shopping spree in Hobby Lobby to find 4x4 blocks, scrapbook paper, and whatever else inspired me. Sadly, I was only able to find small wooden blocks opposed to the 4x4 size I was hunting for. After realizing the miniature blocks were my only option, I snatched them all up and headed towards the scrapbook paper. 

As I was searching in the scrapbook aisle, I decided to go with a autumn/turkey day theme and settled on the phrase "Give Thanks" to Mod Podge on my blocks. (Imagine me standing in the aisle thinking deeply about what phrase would fit on the ten blocks I picked up. It took some deep thinking.)

To start the project, I used my Cricut to cut out the 2x2 scrapbook paper squares. I glued paper on each block and put about two layers of Mod Podge on top. On the chevron side (as you can see below) I glued my turkey day phrase. As long as you don't look closely, the project looks very cute and crisp. If you begin to look closely, you'll notice I made boo-boos all over the place. Oops!


Next time I tackle another block project, I will paint the blocks before gluing on scrapbook paper. Instead of trying to cover each side in paper, I will rely on paint to make it look fancy. I spent ALL day waiting for these puppies to dry so I could continue working. I managed to get caught up on my DVR recordings though! 

Thursday, August 4, 2011

Get Your Sparkle On!


Glitter. glitter, and MORE GLITTER. This post is all about glitter and creating a little sparkle for the first day of school!

First, let's enjoy a few fun glittery thingy-ma-bobs:


Target commercial: LOVE


TOMS: cute and for a good cause


LET'S GO TO THE MALL! TODAY! Oh Robin Sparkles!


The sparliest of all that sparkle, Edward Cullen.


You said it, poster!

We are Not Martha has an excellent (and hilarious) how-to on creating your very own glitter shoes. After my wacky day... I decided this craft was the perfect one to change my mood around. 

We Are Not Martha Photo

We Are Not Martha photo

What do you know? I was right. My mood is mucho bettero. (I'm even making up new words, that's how you know I'm really happy!) Not only did I chat on the phone with two friends, but I also got caught up with my favorite sleazy cast from the shore. Talk about a great Thursday night!

Sparkle Sparkle! 

Thursday, July 28, 2011

Stellar Scientists!

I've got bulletin boards on the brain! Today, I met with a fellow 5th grade teacher for lunch and school-chat. My brain was extremely overloaded, overwhelmed, and excited! I literally came home and laid on my bed and debriefed mentally. After putting on my comfy sweatpants, I busted out the Cricut machine.

We all know how important (and beneficial) it is to display student work. Last year, I had frames hanging outside of my classroom under the title, "Frameworthy Work". When students would do well on an assignment or test, I would let them hang their work in our frames outside. The frames were a little too tall, so I ended up having to help them... but you get the idea! Several times when I would hang our recent projects in the hallway, I would give myself a headache because the students would swarm around the projects and chatter. I don't do "chatting" in the hallway. BUT! It was best for the kids. :)

This year, I decided to hang frames again for student work (in a future post!) Then, Emily suggested I use one of my bulletin boards for student work! Ta-daaaaaaaaaaa! My next project was born.

But first, here are some great ideas to display student work that I have found on the internet.


Clipboards for each kiddo. Check it out here


Bravo board! You will swoon after everything The First Grade Parade posts on her blog.


Clothespins with mini chalkboards available on Etsy. You could totally make these! Just like...


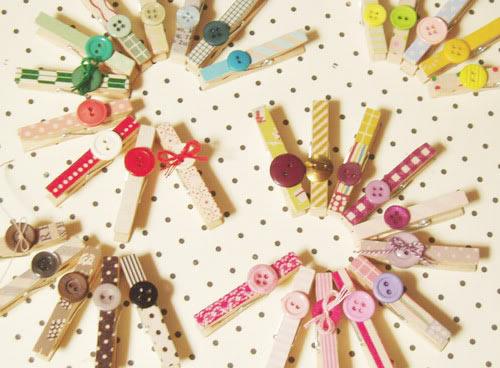
With clothespins in mind, I kept searching. I had clothespins and lucky for me I found this!


Factory Direct Craft gives a pretty great tutorial on how to make your clothespins fancy-fied. 


Using Mod Podge, scrapbook paper, crusty clothespins from last school year, and buttons I created my bulletin board. 


Use your imagination! I have yet to make it into my classroom, so this is a preview of what will soon be hanging in my classroom. 


It's 10:00! You know what that means.. HIMYM is on Lifetime. 

Wait, why is Dance Moms on? I don't approve. 

Wednesday, June 29, 2011

Crankin' Out Coasters

I have been searching for the perfect coasters to compliment my living room. I can never find any that I like.  Since I'm on this DIY kick nowadays, I suppose I'll make my own! 

Luckily, I found The Coaster Tutorial on The Cottage Home blog and fell in love. 


In order to start this craft, I needed tiles. This meant I had to take a trip to Home Depot. Me and a hardware store is like oil and water. Two things that really don't go together. Imagine a cat trying to swim in the ocean. The few times that I have been to them (alone) I usually wander around aimlessly and ask for help within 3 minutes. Today was no different. I made one lap around the store before I stopped and asked where the tiles were. This was my conversation with the Home Depot worker:

"Excuse me, where can I find tile?" 
"Are you tiling a kitchen?"
"Um.. not exactly..." (ashamed)
"What size do you need?"
I made some awkward movements with my hands and spit out, "small!"
"Take a left and you'll be in the flooring department."

I scurried off ashamed! 

Once I stumbled upon the small pieces of tile that I needed, I was SHOCKED by the price. I literally shouted, "WHOA." Hopefully no one heard me. Although, at this point it was no secret that I was a first timer. Anyway, I loaded up with cream tiles at 13 cents a piece and felt like a champion as I strutted to the check out. 

In order to complete this project, I also had to purchase Mod Podge. It's okay, you can laugh. I laughed at the name of the goo too. Whatever it is.. it's great! 


Once I was home with all my supplies and PODGE (hehe), I riffled through my scrapbook paper and got to work! I made 3 different sets of coasters. I wasn't lying when I said I was cranking out coasters. I made one set with flowers on them. Another set with bright colors and stripes. 

My last set was a special set to replace my poor Harrod's coasters that rest in peace. I purchased them in 2008, but they lived a hard life at the bungalaja (it's a real word, I promise) ... so they haven't really been living a good life. I guess it was either me or the coasters that would survive college. Good thing it was me!

Dry my little coasters... dry!
The set on the right are my special "travel" set! The first coaster is my favorite because of it's London theme. Sorry folks, you won't be receiving this set as a gift!

Ignore my finger. Oops! It's probably hard to do since I brought it up. 

Lastly, I made a special "teachery" (that's a word, too) one for my kitchen.  Cute, eh?


Well, that project was a hoot!

That's all folks! 

Add This

LinkWithin

Related Posts Plugin for WordPress, Blogger...