Showing posts with label chocolate. Show all posts

Thursday, May 31, 2012

You're Killin' Me Smalls!

"Want a s'more?"
"S'more of what?"
"No no... do you want a s'more?
"I haven't had anything yet. How can I have something of nothing?"
"You're killin' me smalls!"


How can you not love The Sandlot? Seriously, an amazing movie. Speaking of s'mores, I made a little s'more treat for my weekend visitors. I'm so excited to have company this weekend - I plan on baking all weekend. My guests don't know it (yet), but they are just my guinea pigs in many experimental recipes. Mwaha-ha-ha. I'm only kidding. Sort of.

I found this simple recipe for S'more Bars on Sweat Pea Kitchen. Click HERE for the recipe. I'll show you how I made them through a little photo slideshow.

S'more Bars. Compliments of Sweet Pea Kitchen.


First step: graham crackers.


Sift together your dry ingredients.

Woof. 
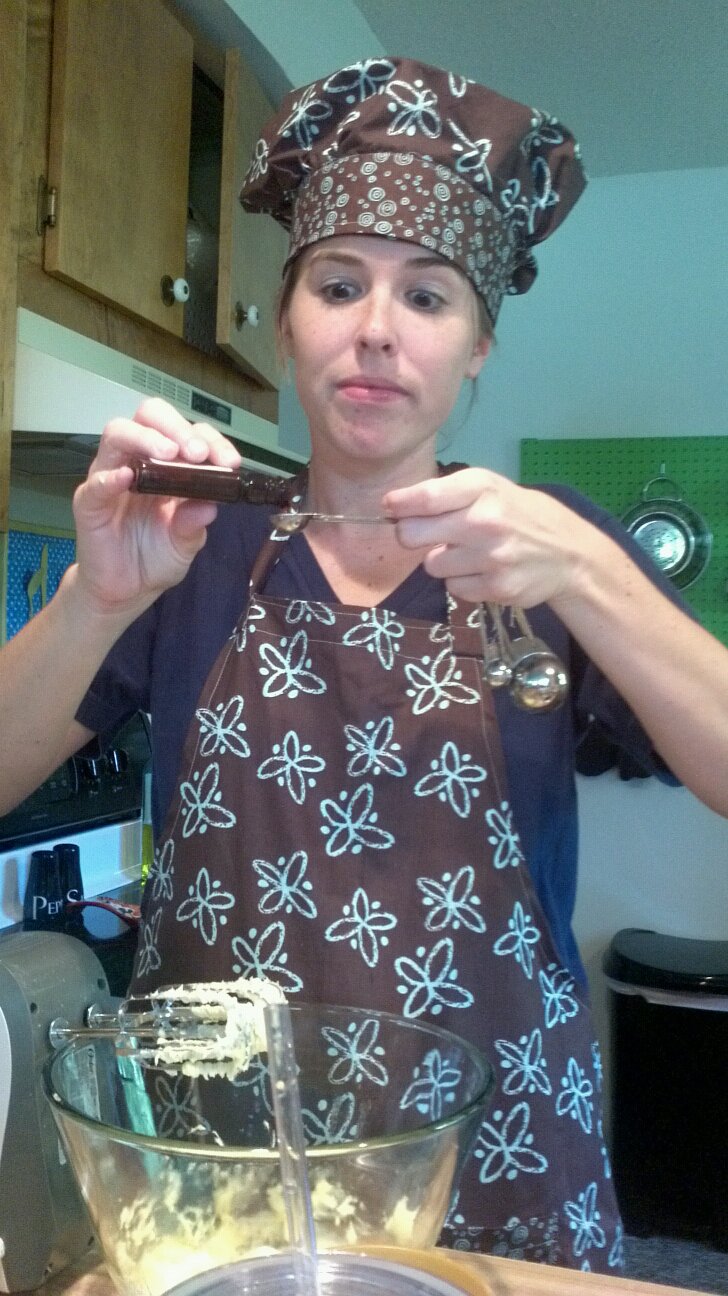
Chat with your sous-chef about the weather and the raccoon ransacking your back porch. 


 Cream the butter and sugars.


Toss in those dry ingredients, slowly. Try not to drop the egg shell in either!


Fold in chocolate chips and...


Mini marshmallows. 


Drop a scoop of batter onto the graham crackers. Cook for 5 minutes. 


Press in chocolate bar. Cook for 7 more minutes. 


Cool on a wire rack.


Take an Instagram picture and share with all of your Twitter followers. 

Then enjoy with all of your friends over the weekend! :)

Tuesday, May 29, 2012

Banana Splits - Texas Sized!

I very rarely save room for dessert. Usually when the waiter swings back toward our table and asks the famous question, "Anyone save room for dessert?" my face begins to shrivel up and I sadly respond, "No..."

I have a new philosophy. Since I never save room for dessert, sometimes it is just necessary to eat dessert first. I believe many people will agree that this is probably the best thing I've ever blogged about.

Let's back track a few months to spring break - hop in your delorean if you will. We took a little trip to Dallas to visit my best friend. It was a spectacular vacation and great to be with good friends. One afternoon before hitting up the pool we went to the most amazing grocery store, Central Market.

For example, they have TEXAS SIZED bananas for everyone: Not just for families ... but singles too!


After staring at the bananas and photographing them for way too long, I selected a bunch and continued on my merry way. I was eager to make a mini banana split and spring break felt like the perfect time to try it out!

Mini Banana Splits
  • Bananas
  • Chocolate
  • Sprinkles
  • Cherries
  • Whip topping

Baked Pita Chips Not Included...

Here comes the easy part:
  • Chop your bannas into thirds (or halves) and dip them into melted chocolate. 
  • Roll the warm chocolate in sprinkles and let harden. 
  • Top with whip cream and a cherry!
  • Eat quickly or else the whip cream will melt!


Abby, the food model!

Tasty Treats!

The banana splits were tasty and a huuuuge mess! I'm not sure how food bloggers make their whip cream look so perfect, but ours was a hot mess. We HAD to eat them immediately. Which brings us back to my new philosophy of eating dessert first. Not a bad idea, huh?

Wednesday, February 15, 2012

S'More of What?

I wanted to make a little Valentine's Day treat for my valentine, and lucky for me... this idea fell into my lap thanks to Facebook!


Crazy Domestic posted her brilliant idea to make Valentine S'More bites using heart shaped marshmallows and chocolate.  I imagine many of you sitting at your computer saying, "yuuumm." I know I did. 

First, I headed off to HyVee to pick up a package of heart shaped marshmallows. Did HyVee have these mysterious heart shaped marshmallows? Of course not. I had to settle for a bag of regular 'ol marshmallows.

Then, I went home to find that itsy-itsy heart shaped cookie cutter hiding in my drawer. Do I own one of those? Of course not. Strike two! Have no fear, I worked around these obstacles and was able to create a delicious little treat enjoyed by all. :)

S'More Pops!
Ingredients: 
  • 1 1/2 graham cracker crumbs
  • 1/2 cup melted butter
  • Dipping chocolate (I'm a BIG fan of Bakers because it's simple!)
  • Marshmallows (any shape will do!)
Click here to follow Crazy Domestic's step by step guide to making your own little S'More pops! 

As always, I don't always shoot for the most beautiful creations... just the yummiest! 


It's Wednesday and Labor Day in the Hamptons..... is anyone else so excited for Revenge tonight? I can barely contain myself. Let's hope I don't fall asleep before 9:00!


Sunday, September 18, 2011

Energy bites, say what?!

I vote we add one extra day in the weekend. We can call it "schmatterday". Then, I will have enough time to lay around and be productive.

Tonight, I tested out a fancy little recipe I pinned awhile ago on the oh-so-wonderful Pinterest. Smashed Peas and Carrots posted a recipe to make No-Bake Energy Bites. Yum!


1 cup oatmeal
1/2 cup peanut butter (or other nut butter)
1/3 cup honey
1 cup coconut flakes
1/2 cup ground flaxseed
1/2 cup mini chocolate chips
1 tsp vanilla

Mix everything above in a medium bowl until thoroughly incorporated.  Let chill in the refrigerator for half an hour.  Once chilled, roll into balls and enjoy!  Store in an airtight container and keep refrigerated for up to 1 week.

Smashed Peas & Carrots photo

These yummy bites are waiting for me in my fridge. I couldn't be more excited. Even without the coconut, they will be delightful!


In honor the Emmy's and quite possibly the greatest week of television, I shall leave you with my favorite television shows. Happy Sunday!

How I Met Your Mother

Photo Source
Glee

Pinterest Photo
Modern Family


The Office

The Sean Lewis

Saturday, July 23, 2011

Channeling My Inner Girl Scout

What's your favorite kind of Girl Scout cookie?

Mine is definitely the classic shortbread cookie. There's something about those tasty treats that make my heart melt. A cookie that comes in a close second is the Samoas! They're a perfect blend of chocolate, coconut, and carmel. Yum yum in my tum.

While browsing Pinterest, I stumbled across a recipe for Homemade Girl Scout Cookies and knew I had to make them. I put on my apron and began measuring away. Needless to say, things got a little messy...

post lake swim
After having an audience while I whipped up these bars, I realized I have more similarities to the Swedish Chef that I originally thought. 


Back to the baking!
what your bars should look like...

With my two friends, Emily and Jolyn, at my side... I began this adventure. Let me just say, this was a multi-step process. Not as "quick" and "easy" as I anticipated. 

With this particular recipe you have to make time to cook the cookie base (yum) and crisp your coconut. That's roughly 40 minutes after preparing the batter. Of course, I hadn't read the entire recipe before hand so I wasn't aware of this. I tell my students to read the directions all the time, you would think I would take my own advice!

After our cookie base had been blobbed with carmel and coconut, I used my trusty pizza cutter to make bars. Then, we began dipping the bars in chocolate. Emily and I both managed to burn our fingers on the piping hot chocolate. So let this be a warning to you... anything you put in the microwave GETS REALLY HOT. (In case you didn't know that already...)

The end product was delicious! I highly recommend this recipe, but if I were to do this again I would take Martha's advice and cook them her way


Ingredients

  • 3 cups finely ground cookies (12 ounces), such as graham crackers or chocolate wafers, or a combination
  • 1/4 cup sugar
  • 3/4 cup (1 1/2 sticks) unsalted butter, melted
  • 1 cup pecan pieces
  • 1 cup semisweet chocolate chips or chunks
  • 1 can (14 ounces) sweetened condensed milk
  • 1 1/2 cups sweetened shredded coconut

Directions

  1. Preheat oven to 375 degrees. Lightly splash a 15-by-10-inch rimmed baking sheet evenly with water, then line with parchment paper.
  2. In a large bowl, stir together cookie crumbs, sugar, and butter until combined. Evenly press onto bottom and up sides of prepared baking sheet. Bake, rotating halfway through, until firm, about 10 minutes. Transfer to a wire rack; cool, about 20 minutes.
  3. Sprinkle cooled crust evenly with pecans and chocolate. Pour condensed milk over the top, spreading to cover completely (do not let it drip over the edges). Sprinkle with coconut.
  4. Bake until coconut is toasted, 10 to 15 minutes. Transfer to rack; cool completely. Trim edges, if desired, and cut into equal-size bars.

Tuesday, July 5, 2011

Land of the Free and Home of the....... CHIEFS! (sorry, old habits die hard)


It's hard not to smile when looking at that little face! I hope your 4th of July was as exciting as mine. I grew up loving the holiday and now I have a true appreciation for it. It's a great way for family and friends to get together and mingle. If you know me, you know I love to mingle!

I went a little overboard with making goodies for the holiday. I got really excited about dipping things in chocolate and using food coloring to dye things red, white, and blue!

First, I cheated. I have never been able to successfully melt chocolate without burning everything in site. So, I bought this:


....and holy smokes! IT WAS AMAZING! It cut down on my frustration level completely and it tasted yummy.

First, I snagged Martha's idea and made Pretzel Sparklers and they were delicious and super simple.

Kudos, Martha!
Next, since I was on a roll with dipping things in my cheater chocolate I moved onto marshmallows. I thought it would be a great idea to have my 2 year old nephew help with this feat. He carefully took the skewered marshmallow and SLAM-DUNKED it into the chocolate. After drizzling chocolate all over the counter and me, I took over. No need for a panic attack on the 4th!


After a few minutes of practicing our colors, I had a bowl full of red and blue M&M's to decorate my rice krispies.

snap, crackle, POP!

The trick to my rice krispie treats is less KRISPIE! I don't put in the full 6 cups of cereal that the recipe calls for. That way, they are more gooey when you eat them. My tip comes with a warning though: once I thought it would be a good idea to use food coloring to dye my treats another color for Valentine's Day. Of course, I picked the color of l-o-v-e: red. Do you know what rice krispie treats look like when they are dyed red?

Raw meat. It was difficult trying to convince people to eat my snack when they thought I had brought raw meat to our food share! Be cautious of what color you dye your treats!

The food I posted today is so easy... your 5 year old cousin could make it. Really, famous chefs would probably laugh at this post because of its simplistic features! Oh-well.. they tasted yummy and were stress free!


Enjoy a picture of my pooch, Alex.

As Tigger would say... TTFN! 

Add This

LinkWithin

Related Posts Plugin for WordPress, Blogger...