Showing posts with label flower. Show all posts

Thursday, July 5, 2012

I Craft, Therefore I Have No Thumbprints

A New Summer Wreath!
Since my blogging adventure officially (re) began last summer, I have developed many obsessions. I have also concluded that I'm probably going to be a hoarder soon if someone doesn't stop me.  One craft that I keep recreating over and over again is the wreath. In my opinion, it's perfectly acceptable to have a new fancy wreath hanging on my door for holidays and seasons.
I have made a few of the yarn wrapped wreaths, but I'll be honest - they take for.ev.errr! Maybe I just don't have that fluid "yarn-wrapping motion" like other crafters. I've really taken to adding rosettes and other embellishments to natural wreaths. Usually I can find a natural wreath at JoAnn Fabric for around $5 or so. Not too shabby if you ask me!

In the spring, I made a simple fabric flower and natural wreath for my door here. Today, I kicked it up a notch and added a fun yarn wrapped letter! 

Once upon a time, my dear friend Alissa and I thought it would be a great idea to wrap the letters "Happy" to hang on my wall. After this extremely frustrating afternoon, I vowed to NEVER EVER wrap another letter with yarn in my life.  It was almost a year ago and I still feel the agony of the afternoon. 

I suppose I was feeling spunky today and I decided to tackle the yarn wrapping once more. Considering it was only ONE letter.. I did survive this feat. I didn't throw anything across the room and I most certainly did tackle that letter! Let Birds Fly gives a simple (and positive) tutorial to yarn wrapping here. 


Using a few fabric rosettes, I jazzed up the 'ol naturale wreath. While wrapping those rosettes I managed to burn my fingers several times. The feeling has come back in my fingertips and I can feel my fingers tapping my keyboard. 


Now, it's time to prep taco lettuce wraps for dinner tonight. Enjoy your Thursday, folks!

Linking up at these parties:

Thursday, March 8, 2012

Two Truths

This week I've realized two obvious truths about myself: I'm addicted to wreaths and I'm a borderline hoarder. Let me explain. 

I had this great idea to use each night this week to clean out a different room in my house. First, I wanted to start with my kitchen, then move to my room.. blah blah you get the idea. Well, as I was tackling my closet I was picking and choosing what to keep and donate to Goodwill.  I found myself clinging to everything. My poor friend Emily had to listen to me on the phone while I was talking myself in and out of keeping things. After realizing that it's just a t-shirt and not the ticket and/or experience from which I bought the shirt... I started chucking clothes in trash bags like it was nobody's business. Take that hoarding! Just when I thought I was making serious progress, I still had crap (pardon me) everywhere that I just couldn't part with. Don't get me wrong, I'm making quite the donation to Goodwill, but there's a lot more work to do.

 I dare you to come over to my house when I'm 80. Actually, I triple dog dare you because I'm probably going to need help cleaning out my crib.

Now, my second obvious truth. I love wreaths. Since spring is popping up around the corner, I did what any logical wreath addict would do... I made another one. (This also adds to my hoarding issues). I used a basic natural wreath from JoAnn's and hot glued a few fabric rosettes on top. Now, my front door is welcoming spring and the occasional postal worker who comes-a-knockin'. 

Here's a great tutorial for rosettes! Click here. 


The hot glue really glistens in the sun, doesn't it?


Happy It'sAlmostFridayAndICan'tContainMyExcitment Thursday!

Thursday, February 23, 2012

A Wreath For Your Thursday!

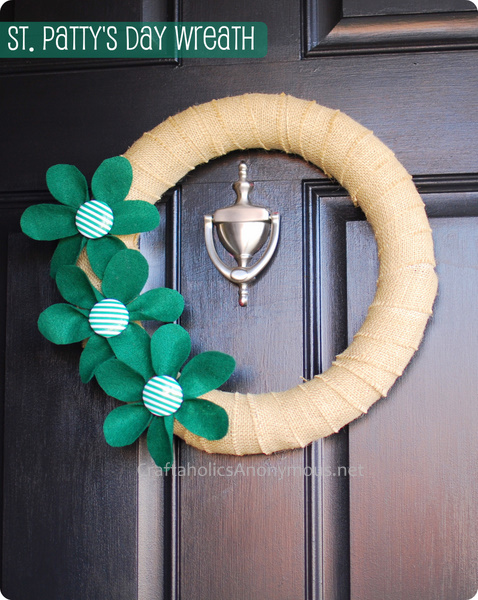
Bless you, Craftaholics Anonymous, bless you. Not only did you come to my rescue and save my naked burlap wreath, but you are the queen of quick and simple seasonal wreaths. Your gift is appreciated here!

I pinned this little gem a few weeks ago and thought it was the perfect solution to my poor pitiful wreath. Let me back up, about a month ago I attempted a craft night. Instead, I had a great evening catching up with a friend and all I managed to do was wrap a straw wreath in burlap. Now you're up to speed on my naked wreath.

Back to business! My new favorite blog, Craftaholic's, gives a great description on how to make very simple flowers from felt, buttons, clips, and glue. See for yourself!

Here's what I used:

  • 1 naked burlap wreath
  • felt
  • buttons
  • clips (I'm sure there is a more scientific name for them)
  • hot glue


Originally, I wanted to make my very own St. Patty's Day wreath but as usual I ran into a few obstacles. This time the obstacle was the color green. Yes, that green button is shining visibly in the picture above - but did I notice that last night? Of course not. I was extremely convinced that I did not own any green buttons or fabric of any kind.

Naturally, I moved onto Plan B. What colors are never out of season? Black and gold, baby!


Does anyone watch "The New Girl"? This week's episode was precious and about a situation in Jess' classroom. Check it out!

Friday, July 15, 2011

WAIT! Don't throw that shirt out just yet...

As you know, I'm in the process of moving. With moving comes packing and going through all of your belongings. The majority of my time was spent in my closet... riffling through old high school and college shirts and hard rock cafe t's from vacations. Of course, I couldn't part with any of those. Although, I did find a few that I could spare for a few crafts!

Little did these t-shirts know that they were about to experience a second life. Lucky them!

First, I googled "t-shirt craft" and found this tutorial on Whole Living. It even comes with a little video and everything. I would have watched the clip, but I have very s-l-o-w internet so it would have taken a century.

seems easy enough!

B/W to hide my sweat from the 100 degree temps

I got fancy with mine and added a flower pin. This was easy-peasy-lemon-squeezy.

I also found other fun scarf options on The DIY Dish, but I didn't create any. I think YOU should.


Who doesn't love an adorable flower to be on display in their living room? Well, I am pretty sure I speak for everyone when I say everyone loves having adorable flowers in their living room.

A Little Lovely Blog posted a tutorial on creating flowers from t-shirts. All you need is some sticks and t-shirts! (The tutorial has other materials but all you really need are sticks and shirts!)


While I was hot-gluing my flower to the stick, I became entranced by a fight that broke out on One Tree Hill. I accidentally broke my brand spankin' new stick!

 Good thing the stick was free! Also, good thing it's a stick and it doesn't really matter if it's broken. These are my kinds of crafts. 

A little glue and nobody can tell!
Ta-daaa!
Last but least, Let Birdz Fly has a tutorial on creating a necklace from two shirts. The finished product looks pretty fantastic, but I ran out of shirts. I'll have to raid Andy's closet before I tackle this project!


Do these crafts make me green? Or just someone who likes to cut up their clothing?
Ponder that one.

Sunday, June 26, 2011

Sunny Sonntag

My vacuum has seen better days. I thought I might give some life to it by changing the belt. One might think that this would be an easy process. FYI: it's not. I bought three different Eureka belts at Wal-Mart and let them sit on the counter for 24 hours. Today, using my tools and the instrucional guide... I tried changing the belt. After what I thought was a successful process, I began to vacuum.


Oops!

My poor vacuum started smoking violently. I shut it off and ran away from it. I couldn't run far because my apartment is small. Instead, I hid it in my kitchen. Hopefully the vacuum fairy shows up quickly to repair my smokey vacuum.

It's craft time. I'm excited about this one, because it was remarkably easy and fun! I was able to successfully watch Beverly Hills 90210 on SoapNet and make flowers from fabric.

This year, I bought a significant amount of fabric to decorate my bulletin boards. Fabric lasts longer than butcher paper, so it may cost more but it's worth it.

I found the perfect tutorial on The Secret Stitch Club's blog. I was super pumped because it didn't require a needle and thread or sewing machine! First, I decided to make a gift for two friends who shall remain nameless at this time. I bought cheap frames at Target to decorate. I gathered my fabric, glue gun, frames, and fancy buttons and starting crafting!


I discovered that the flowers are much better when you cut thicker strips of fabric. Also, the thicker the fabric the better! The online tutorial takes you through each step in making the flowers:

1. Tie a knot at the end of the strip and glue to surface.
2. Twist fabric and glue
3. Repeat!

My flowers at first were quite small but then I figured out the secret to success. 

Up close and personal 

The perfect gift!
Next, I decided to put that one last canvas to good use. I made three more flowers and glued them to the white canvas for wall art. I'm not sure where it will go on my wall, but it's great to have options!


As you can see, I made a boo-boo on the finished product. I originally had a smaller yellow flower, but it didn't quite mesh so I peeled it off. Once I find some, I'm going to add some tulle to hide the sticky glue mess. I highly recommend this craft! It was pretty simple and fun!

That's all folks! 


Add This

LinkWithin

Related Posts Plugin for WordPress, Blogger...